Hello guys. I'm Peter from Build a Boeing. Welcome to my work shed.
It's now summer and this room without heating is now bearable to be in.
In the winter it gets rather cold out here.
I've started a new project which is sidewalls for the
cockpit and you can see the back of the first officers side right here
I'm using the drawings made by Vidar back in 2012 you can see them here and
they come with a bit of text a lot of pages with different measurements and
they even come with two pages here with cutouts for your MDF
I have been inspired by Mickey's flight deck. Michael did the sidewalls and it looked fairly easy.
And it isn't all that difficult you justneed to take a few things into consideration.
As it says in the text here you need to measure twice and cut once!
You get these for free. You can download them from the internet
but there are there are a few things a few places where the measurements
doesn't quite match up. So make a cross reference to this with this and
then you are up for good start.
Should you do something wrong the light blue pieces up here are not used.
So you can always make extra pieces using that part of the MDF plate
Watch Mickey's video. It has many good examples of what you need to take into consideration.
Then I can build on top of that perhaps.
I'll just go through the different pieces and tell you my experiences and that can hopefully help you.
But watch Mickey's video it's very good and will give you most of the things you need to know.
I am using a plunge saw like that and a rail you can see it here and.
Then you lay that on top of the MDF and you just wraaaaawwww
cut your way through and it gives you precise cuts. It's just a fantastic tool!
However it has a sawplate of three millimeters so
whenever I make a cut I can add additional three millimeters here, here and here.
There are seven cuts on this piece so that ends up in the next two centimetres
which I don't have here. So anyway, I had to take out one of these pieces and
put them up here.
You're gonna run into problems with number one unless you double check the measurements.
Number one goes underneath the table which you have up here and the
width of the table is 24.7 and here we have the table cut out and you can see
the width down here of 24.7 centimeters
Number one looks like this
It's a bit difficult to see perhaps. But here you have 24.7 cm
and then you have an additional piece on the side and I've
written six here. You can make this as wide as possible. Six at least if you
have eight centimeters that's even better part of this is going to be
hidden and so you can use it to fasten it to the other piece of the sidewall.
But you need to make it 24.7 plus an additional six, seven,
eight centimeters that gives you at least 30,7, 31
32 perhaps even 33 centimeters with of number one
Looking at the drawing if you go from 24 here to 33, you can see that
you're not able to fit number 9 here so number 9 needs to go somewhere
else perhaps on MDF number two
Number one goes on the table as I just mentioned like this
This is upside down so
this is the floor and this is the table top.
When installed is the opposite way.
You need to adjust a height of number 1 from the floor here to the tabletop
so that it is a total of - if I remember correctly - 37 centimeters.
So number 1 should be 37 centimeters minus the height of your MDF
I'm using 12 millimeters so that is 37 centimeters minus the 1.2 that's 35.8 cm from here to here
and then an extra 12 millimeters to here gives me a total of 37
That was number 1 number 2, 3 and 4 sits on the side here number 2. my
My recommendation is make it as wide / long as possible.
You need to adjust to height once again so that fits number one.
Remember the heights on these drawings are the total height not taking the height of your MDF into consideration.
Make number 2 as long as possible here
So if you can just make it longer
Now number 3 comes on here and my recommendation with number 3 is make
number 2 - as I mentioned - as long as possible and then cut number 3 - let's
see if I can take a pencil and do like this
Cut number 3 right there so that number 3 has two 45-degree cut and
goes on the side of number 2
The same goes with number 4 again cut number 3 right there
so that it comes on the end of number 4 what would be here, like that
So the number 3 is cut at a 45 degree angle
Reason for this is it's always easier to cut a small piece and like number 3 if you do
something wrong and make an error then make a whole number 4 again.
Furthermore if you do it like this you can add wooden
supports on the back here and here to support number two number 2 and number 4
But, the main thing with number 4 is you should install it I recommend as the
last part in your table.
The reason is the
distance from here and that way depends on your main instrument panel what you
already have installed
It takes around 10 or 15 centimeters I don't remember
the correct measurement (it is 10)
So from here to here where you can cut it or where your
main instrument panel should go should be around 10 cm
Now I already have 10 centimeters in my instrument panel
going that way so I only need like five centimeters or so
but you need to find the distance from this edge to your main instrument panel
or whatever you have installed already and then cut number 4 - before you install it
Because once you've installed it together with the table you're not able
to make a straight cut down here
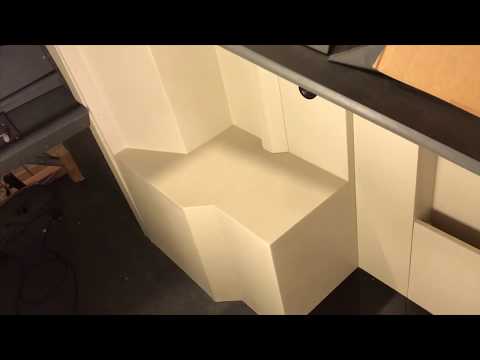
A, B and C is pretty straightforward
Just make a box but when you connect it to 9, 10, 14, 13 and 12 it might not be just making a box
Let me just make move this
here so that it's connected flush with the edges here and then you can see
I'm actually missing 2 centimeters down here
I had a bit of problems figuring
out if number 9 should go on the side of number 10 or on the back of number 10
here of mounted it on the side
Over here I've mounted number 13 on the back of
number 12 not on the side that might explain why I have a gap down there I'm
I am considering making a new box so that it fits
I recommend you make number 12 and 13 as one piece first make them as long
as possible longer than they are on the drawing
Add an extra 5 centimeters or so.
And you make number 9 and 10 and put them together again longer then on the drawings
Number 9. You need to correct the measurements and number 9 if you'd
have done here number 9 has a height of 65 centimetres and 63 centimeters
at the bottom. That is not the correct measurements
Number 14 here is 60.6 centimeters number fourteen is this.
It goes up here at 60.6 cm which means number 9
should be 60.0 cm at this end
But here on drawing number nine
if you do calculation from 65 to 63 you will find out it only has a 10 degree angle
not the 20 degrees angle that's used here so you need to recalculate and
my calculations is 60.6 at this end and then 65.7 up here
Make your own calculation and make sure that you have the correct measurement
Which means make that make it 65 plus an extra few centimeters 66
67 - 68 centimeters and that goes for number nine and number ten and once you
make these two glued them together use a saw and then cut it at 20 degree angle so that it fits here
The same for 12 and 13 make them higher than this
glue them together, screw them together do whatever you want and then take them to
the saw and cut them at a 20 deg. angle
Apart from that it isn't all that difficult with the back part
Next up is getting the sides on table and then we have almost a sidewall
Moving on. You now need to concentrate a number 8, 7, 6 and 5
Before we can do that let me just say I recommend that you mount the base here
unto number 9 and number 13 using screws down here put them in there
it's not going to be visible and it gives you a steady structure otherwise
this might be a bit wobbly
Furthermore number 1 I mentioned make it as wide as possible and here's the reason.
I'm gonna take some wood like this and put it here on the back of number 9
That gives me something I can put screws into
from the back of number 1 that way in so that this is steady mounted
onto number 1
Furthermore number 1, you need to continue this twenty degree angle
and the easiest way of doing that I reckon is to
take a ruler and then just place it there use a pencil and then mark where you should cut
Of course that cut should have been made before a mounted number 1 on to the table!
Lesson learned! That's going to be a bit difficult but
you need to continue to 20 degree rise here before you move on to number 8, 7, 6, 5
Moving on to number 8
Number 8 goes here on the table on the side here
after number 1 you can see my number 8 I made it too short
So I need to make a new one
Always triple check.
Double check, triple check and then cross check all the measurements found on these pages with
the measurements in rest of the document and make sure that the heights
here are actually matched over here
You cannot - I have set this a few times, I'm
gonna say it again - you cannot cut these out and expect them to fit perfectly.
You need to double check the different parts of document and you need to take your
own MDF into consideration.
So double check these and as you can see I made it too short
I recommend you make it 5 or 10 centimeters longer because you
have to mount number 8 unto something that's not on the drawings either.
Number 8 I'm gonna mount on the back here on the side
you can also see it I've made it too long I'm not gonna mount it on top like
this but on the back like this
The reason for that is I can then take a
piece of wood like this and put it in here put some screws onto it and then I
can mount number eight onto this piece and make it steady
so that it doesn't move around
After having put everything together here it is now time
for some glorious glorious sanding!
All the joints here need to be flush and
smooth and all the surfaces need to be prepared for paint
I'm starting out with grain 60 then 120, 180, 240 and perhaps I will just give it a quick run over with a 320
Just get it nice and smooth so
Let's get to work
This is the front of the first officers side table
It's been sanded
all the cracks in it filled out, sanded again with grain 320
Really smooth and nice edges and over here I've now started priming it before I give it the
first layer of paint.
One thing I've learned over the years never save those
few extra bucks on your paint. It's gonna be visible! Just spent the money
necessary by the good paint, buy a good primer and you won't regret it.
Those few dollars saved or euros saved in the cheaper paint it's just gonna
make a miserable result afterwards.
So I better get these primed and ready for the first cover of paint.
This is what it looks like when mounted in the cockpit.
This is the first officer site and over here we have the captains side.
I'm very pleased with this!
Compared to the cardboard I had before - which you can see up here - this is
something totally different
Still a few things that I need to do
like on this black thing down here there are rips going across
I was actually searching for wood cut as triangles but wasn't able to find any so
need to make them myself just haven't had the time over here
I'm planning on a socket for a handheld microphone then of course a cup holder
which is on the way. A chart holder that goes here and a light panel up here and
then at some point perhaps an oxygen mask panel.
But until then that would just be empty space for your iPad or phone or whatever you have.
Then the grill here the air grill. I've been searching for a 10 by 10
centimeter air grill. Haven't been able to find any. So I'm still searching for that.
Then at this part here I'm planning on a piece of metal on the bend
here around around the corner so that you're not able to see this MDF
So the top of the MDF not is so visible as the case is right now.
On the captain side over here I do have a light panel as you can see there.
Which is actually just two pieces of Plexiglas put together. It is homemade - not very difficult
And then a tiller installed on the side as well
It really adds to the realism
I can't remember if I said this - 'cause this is like the tenth time I've recorded this part of the video.
but it really adds to the realism to sit in something and be
surrounded by something that looks like something from the real airplane instead
of this cardboard
It's a pretty easy project to embark on.
It's not very difficult it just takes time.
It has taken me like two or three months to do this.
Of course not every day but just when you have an hour here-there in the weekends.
Two or three months or so.
Next up is the window frames
I've actually just started on those on the top here hopefully that would give me a
better finish as well for this part. So I'm going from the bottom and up
in a structure version 2. That will be my next project and that should probably
take me like three or four years to finish that (Including irony...)
A few final notes
As I've mentioned many times in this video make the pieces bigger than you expect them to be
Because you can always cut away but it's very difficult to add length to you wood.
When you're ready to mount it put these pass here on before you use
the filler and before you paint. I did it the other way around and you can see
there's a black line there where the joint is.
And of course if I had used filler I could have gotten rid of that.
I spray-painted these so
it's a bit difficult to start spray-painting now inside the cockpit.
So I'll have to live with that.
Furthermore always check your angle to watch the floor that this goes up in a 90 degree angle
As you can see over here Peter didn't do that.
So it leans a bit inwards here then it goes out again.
I'm gonna have to use some filler on that to make that the gap disappear. on the captains side it is better.
But always check that it's actually in a straight line up
instead of stupid mistakes like that
Here just before I end. A very big thank you to Mickey from Mickey's flight deck
Michael your videos has been such a huge inspiration and of course a big thank
you to Vidar who make the plans for these sidewalls some six years ago and
They're still the best I could find.
I'm Peter from Build a Boeing and you guys take care! Bye bye...
Không có nhận xét nào:
Đăng nhận xét