Hi. This is Sally Lynn MacDonald with Gel Press. Today I am going to be
showing you magazine image transfers. If you want to take a look at all of our
different image transfer techniques I will be linking it down below but it is
http://gelpress.com/imagetransfers Today we are going
to be tackling magazine image transfers. I have been doing a lot of
research on this. Birgit Koopsen had done some work with
this where they were using acrylic paint to adhere to the print, and I found it to
be a technique that wasn't easily replicatable. And I don't typically jump
on board if I find something not to be easily replicatable or something that I
can do in a classroom and have everyone be successful. So that is where my wheels
started turning about why or how I could make it work better. I went back to
other techniques I had done, most notably the newsprint image transfer, and that is
where I figured out how to make it work better. So you cannot use every magazine.
High-end magazines, such as
Vogue, Harper's Bazaar Elle they tend to work great. I wouldn't want to call them lower end but less pricey magazines such as
Teen Vogue and Seventeen don't work. And it comes down to multiple factors
including the paper that they are printed on. I believe it has something to do
with any amount of recycled content as well as the ink that's used to print
them. So your daughters and sons are safe. We won't be printing Justin Bieber's
face today. But we are going to be working with Vogue and Elle and a bunch of
images to show you how this works. So this technique does not use the typical
material that we use with a Gel Press plate. Typically we would use an acrylic paint
or even alcohol ink. But this one works really great with R&F Oil Pigment Sticks
One-step. Easy to work with. So let's go ahead and do it. I'll show you how it
works and we'll go from there. Here is a gorgeous looking print. Now
what I like about this is that there is high-contrast. First of all it's really
great that it has a frame. That is just fun to work with. But a lot of high
contrast. The image has lots of different shapes and you can see the big contrast
between the background and the foreground. And this one
is great too. Honestly either would work great. I mean you want to be able to
to tell if the technique is working. So you need to be able to see
through the paper to what's on the other side. So you don't want it to be so dark
on the other side that you can't see. And that's just during the process. I'll show
you how that works in a moment. I'm going to start and show you. These are R&F
Oil Pigment Sticks. These are the only ones that I have found to work for this
technique. What I have found is the best ones for this technique are opaque
so you'll see the ones that say they're opaque on the
label, those work best for this technique. So I am going to take one here and just lay
out some color on my plate I'm going to do one color and I'm going to do
it on a plain piece of paper first just so you can kind of get a sense for how
this works. First of all you'll see that they apply nice and smoothly. That's
part of what I really like about them. You want to work on a very clean plate
for this technique. We are going to put our image face-down. And you don't want to
manipulate the paper a lot. You don't want air bubbles. You don't
want any air bubbles. So if you can see them try to get rid of them. And then
stop manipulating it. Because the more you manipulate it the more the oil paint
is going to move around underneath. Now how to tell it's ready, it's super simple
as you're looking at this I think you might be able to see it on the camera if
not I'll try and take some closer up shots but here this eyeball. I can see
that coming through almost like a white text. I can see the black text coming
through as white on the reverse side of the image and that pretty much tells me
that we're ready to go as soon as I start seeing that come through. Now I
haven't noticed that there's any need to hurry. It's not something you have to
be fast about. But until you see that coming
through you don't want to pick it up. Once you see it, you can pick it up. And
we'll just take this back.
So as I pick it up you can see there's still some leftover stuff with
the brayer there that I can see. Maybe a little extra ink, but the beauty of it is
that I can go in first of all I could take this, to be clear about what I like about
this technique. I can actually reuse this image if I want to in collage by
simply applying a baby wipe, because this is clay-coated paper, I can remove all of
the oil paint that I applied to that and actually reuse that image. Not for
another transfer but for a collage. So I like that. One of the things you can do
is texture. You can go ahead and texture the material on the plate. And I
typically like to use really tiny textures for this. So in this case I'm
using the kitchen trivet just to add some detail or interest. As I said, you
don't have to rush to do this technique. And now I'm just going to pull this print.
For the purposes of this video I'll pull it on just a plain piece right now. Just
pull the entire thing and literally just making good contact.
And pulling a print. I want you to see the level of detail that comes out on
these prints. So there is just so much that you can work with there. Isn't that
really fun? You typically can't get much of a ghost print depending on how much
you put down. But you can always give that a try and see. Because there's
always something useful there. And this is where I typically go with little
leftover tags and stuff, just to get that really nice hint of an image. Isn't that cool?
Now we are at the point where this needs to be cleaned off. To clean off oil
paint from the R&F Pigment Sticks a drop of baby oil will do it or you can even
do a pickup print with a little bit of acrylic paint. For a pickup print
which is what we call this kind of technique you don't want a fluid acrylic.
You want something that's got a little bit of a body to it. If it's too fluid
it's not going to pick up anything. I think as I've told many of you before I
used different brayers for different mediums. So I'm just going to prime my
brayer with this paint and then roll it across the image to get a nice even coating
of paint on all the surfaces where the oil paint was. And then just take a piece of
paper and place it on top of this
and get a pickup print.
We still get another usable print out of that. Isn't that cool? To clean, just apply some
baby oil to the surface. Just a little bit and then clean off and get the oil paint leftover from the printing session in
that color. That was a black and white image and it was a very bold, graphic
image. This image is color and has a lot of fine detail. Look at all that texture
around her face. And that's really all I want to capture. So I'm going to grab a
color. Let's just pull out this quinacridone magenta and lay some down
on the plate. This is another nice opaque color. And I usually put enough on the
plate that would basically cover where the images that I want to capture. You
can clean your brayer between colors if you don't want the colors to mix. I don't
mind if this blue mixes with that magenta, so I'm not gonna do that much
cleaning. Because I like when colors mix. I wouldn't apply this as thinly as I would
apply an acrylic paint. I apply it a little thicker than that. And once
again, making note of where like her eyeballs are...
Press that image app hope for no air bubbles on important bits. Now right
around here there is an eyeball. If you're having trouble locating a focal
point to look for the soak-through point, where it starts bleeding through the
paper, you can always hold your plate up to a light source and then
you'll be able to see exactly where those focal points are. For myself I can
already see this eyeball and all the texture around her face on that hood is
starting to come through on the other side of this paper. So that's very
helpful. I think as I said in an earlier portion of this if you have a whole
bunch going on on the on the backside of the paper it's hard to see that point
where you've got success. But once you get confident in doing this, you really
won't need to look. You'll know it's working. But when you're just getting
started we're looking for all that detail is starting to come through So
let's go ahead and just make good contact and pull the print. Pull the
magazine off of the plate and you can see all
that ink which has been pulled off of the paper and is left on the plate.
Now more solid areas typically tend to get bubbles in them and that's just
because we're literally have air bubbles that are trapped between the magazine
page and the paper because this is a non-porous surface but all the detail
that we want is also here. So that's a lot of fun to see. And once again you
could take this and clean off the baby wipe to reuse it in another print. For
now we have a beautiful print here. Let's try something very different
As you can see color works just as well as black and white. So we're going to go
ahead and just pull this once again on a piece of plain paper so you can see the
level of detail that we're getting. This is just a piece of plain copy paper. I
tend to use Hammermill color copy digital.. Because it's made for printing
color prints it does a really good job of letting these colors pop on the page
as well. Also I will say that the Gel Press has a wonderful feature of self-
registering. So if you make sure one edge of this paper is down on the plate you
can always go back down if you need to pick up more detail. Like if you don't
get all the eyes or a little bit more mouth detail you want to get, you can
always go back down. So there you can see a lovely print. Isn't that amazing? And
the ability to capture all that detail on a pull. That's our initial print, Let's
see if we have any ghost print hiding in there. Grab it on a tag just to see.
Obviously don't get the eyeball there where the hole in the tag is. That
wouldn't work too well. And just make good contact. Ghost prints can be finicky
They may give you nothing. They may give you everything. But we're going to go ahead
and attempt it. Very faint but an interesting start to the next piece. And
then whatever is left on here we can do again, as before, a pick up print. That's
where you take a little bit of acrylic paint... And this is an unnecessary step.
You don't have to do this part, but I tend to want to use
every bit of what I have on this plate. So unlike other techniques where I've
seen it's kind of a one-hit wonder, I want to be able to get everything that's
there. If it is there I want to go and get it. So with a pickup print, just coat it thoroughly,
thinly and evenly. I need to be able to see the other
color peeking through. And then that will give you the ability to have that media
adhere to your paper and pull that media off the plate with the adhesive
properties of the acrylic paint working with you. So you can usually effectively
get an initial print, a ghost print and oftentimes a decent pickup print as well.
From one application of the oil pigment stick. So it's super fun to work with.
It works with color or black and white. Okay so it's cleaned off. I have several pieces
here that I could use for this process. Let's see what we've got here. That one's
awfully cute. Sorry it's the selection process. It's
difficult. I'm going to go ahead and pull this one that's really cute it just has
a lot going on with it. It's fun with a lot of technique and a lot of
detail on there. So let's get a fun color. I think we are going to go back and
use the quinacridone magenta again. Yeah. Lay this out
Use my brayer for the oil paint. It's all about a smooth application. You don't want to see
lines and you don't want to make it too thin. You do need enough oil to be there to
soak through the magazine paper and pull that ink onto the plate. Okay. So we're
going to take this image. Once again I'm looking at this part here, which I know
is a great part where her print is showing. Try to get out air bubbles. You
won't be able to do it all the time, just because the paper is so very non-porous
but you can already see that black and white print from her outfit where her
bag is, her hair coming over here. You see the white coming through. That's your
clue that the oil is doing its work. That it's soaking through the paper and
that's really all we need it to do. Soak through, grab that ink and deposit it
onto the plate. So let's go pull that print. Look at the detail. Isn't that
amazing? So much detail there in that print. And this time once again I can
take this and use a baby wipe and clean it off if I want to use it for the
print itself. But this is just so much fun to work with. I'm going to take
that and do a little bit of fun with the Carabelle art textures just to add to
her hair.
Pull that a little bit. That's kind of fun.
And I can go on to that outfit which already has a really fun print. But also
to put this bit of words from 'Letters on a Checkerboard'. I'll do that as well
So it just has a subtle print. But you can manipulate it. That's the fun part of it.
All right. We have several prints here. The more ghostly it is the better you're
going to be able to see things. So this has a lot of good open spaces. You know
something like this obviously this might be fun. We'll consider it. Let's just flip
through the ones that I put aside. I'm going to avoid things that have a similar
color scheme. So that may help me already just kind of limit my choices. I think
I'm gonna go with this one... See? Decisions... decisions...
This is a really cool print. I think I want to use it. So I think
this is a really cool print and it's got a lot going on already, but no focal point
in the center. So I'm going to go ahead and use it
for this print.
As you can see I didn't have to hurry. I don't have to wait for things to dry. I
didn't have to hurry and do anything because it's oil paint. So it's got a lot
of open time as far as its ability to be manipulated and to have that print
pulled. Self-register. Pick it up. So there we go
you have all that image integrity and you've layered it on top of an existing
print and all of that fun stuff just coming through. So there's nothing in
between the print and your paper. Which is super fun. So you could print this on
top of old prints all day long. And for the ghost print perhaps this is a very
subtle pattern so let's see if we can get that. Ghost prints? Maybe not.
Sometimes you can't get them. This all comes down to how absorptive
is your paper. Did it pull it all up? Did you put down enough to begin
with? So ghost prints... you may not get anything but you haven't sacrificed
anything either. Because still look at the level of detail! And sometimes it
works really great! So you have all that detail. It's so much fun to work with. To
create a piece. Very much fun. And whatever's left you can use for a (pickup
print). Last one! And go ahead and put a layer of paint down. Because I can see so
much image left on the plate. I hate wasting it. I always like to get that
third and final pickup print out of it, if possible. But this step honestly could just
be where you're cleaning off the plate. Or you can actually get a print that you
want out of it. So totally up to you if you want to do this part. So we're going to go ahead and pull a print on top of
something that could use a little muting. So
I'm going to do that on purpose. That Titan Buff will cover up some of the
background from that print. And when you're doing that pick up print the
first thing in will be the last thing facing out. So the Buff is now acting as
a backdrop. And so it's going to cover up some of the print in
the background, but you're still going to get that oil paint image transfer on top.
So let's see what we got. Shall we? Then
we have a nice print. See? Another useful print out of it. You still have her face.
We still have her outfit. A lot of fun things we can do with this. And it
cleans off the plate so I can move on to my next print. So that's it for today.
I'll show you some other prints just so you can see the level of detail and some
print I pulled before we got together.
Just for inspiration so you can see some of the prints I pulled before we got
together. This one which I did directly on top of a background just a
lot of fun and textured her outfit. This I showed you basically how to do today,
with a similar print. But it's soft and ghostly feel. Very nice. The blonde models
always give you a good look. For the men in your life, pulling a print with
that Payne's Gray is just a lot of fun. I
believe that's Katy Perry and she's on top of a cobweb background that I had
already done. Oh goodness. I almost forgot words. All of the words that exist in a
print and in a magazine article also pull from this effect. So this print
I actually just did the words of an article on top of the Rose Mandala (Impressable) so yes
words do work too. Then lastly, the puppy dog. Just to show you again the level of detail.
This image had a lot of contrast going on but you captured all the detail
and just super-fun. I can't imagine how fun this would be be to use on a project.
So I hope you enjoyed today's video and I'll be following up at some point later
in the week, probably on the weekend with some pictures of different projects I've
made using these prints. Thank you for watching. (http://gelpress.com/imagetransfers)

 For more infomation >> Funeral Services Set For Fashion Designer Kate Spade - Duration: 0:14.
  For more infomation >> Marcha atlética na passarela: grife tem performance inusitada em fashion week - Duration: 5:01.


 For more infomation >> Fashion Designer Kate Spade's Funeral Held In Kansas City - Duration: 0:24.
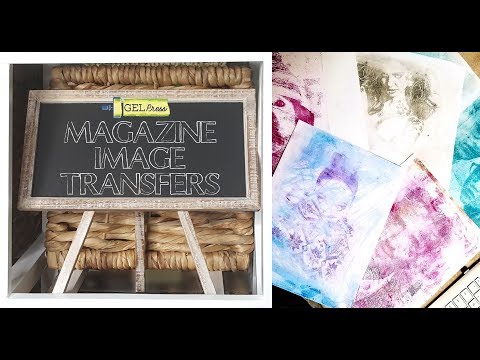
 For more infomation >> Prince William REVEALS: Princess Charlotte is already 'OBSESSED' with fashion aged three - Duration: 4:53.
  For more infomation >> Melania Trump's Migrant Center Visit Marred By Fashion Choice | The 11th Hour | MSNBC - Duration: 13:26.
  For more infomation >> Melania's Trump Jacket: Hidden Message Or Fashion Misstep? | Deadline | MSNBC - Duration: 6:05.
  For more infomation >> Fashion Designer Kate Spade Laid To Rest - Duration: 0:23.

 For more infomation >> Dee Ware Fashion - Duration: 5:14.
 For more infomation >> Marcha atlética na passarela: grife tem performance inusitada em fashion week - Duration: 5:43.
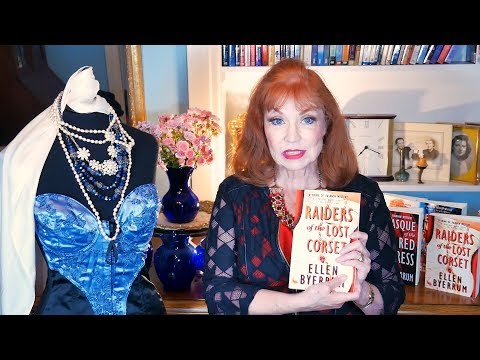
Không có nhận xét nào:
Đăng nhận xét