Thứ Bảy, 26 tháng 8, 2017

Auto news on Youtube Aug 26 2017

As well as developing and testing missiles,... North Korea is forging ahead with its nuclear

ambitions.

The International Atomic Energy Agency is warning that Pyongyang has ramped up efforts

to produce parts for a new nuclear reactor.

In its annual report released on Friday,.. the UN watchdog said the regime is still operating

its main reactor while it prepares to build a second one.

It says there are indications in the light water reactor construction yard of an increase

in activities,... which is presumed to be fabrication of certain components.

However,.,.. the IAEA, which has to rely on satellite images to reach its conclusions,

says it has not observed indications of the delivery or introduction of major components

into the reactor containment building.

The new reactor is expected to be larger than the current experimental one at Yongbyon.

For more infomation >> North Korea steps up efforts to build new nuclear reactor: IAEA - Duration: 0:53.

-------------------------------------------

North Korea steps up efforts to build new nuclear reactor: IAEA - Duration: 0:55.

As well as developing and testing missiles,... North Korea is forging ahead with its nuclear

ambitions.

The International Atomic Energy Agency is warning that Pyongyang has ramped up efforts

to produce parts for a new nuclear reactor.

In its annual report released on Friday,.. the UN watchdog said the regime is still operating

its main reactor while it prepares to build a second one.

It says there are indications... in the light water reactor construction yard... of an increase

in activities,... which is presumed to be fabrication of certain components.

However,.,.. the IAEA, which has to rely on satellite images to reach its conclusions,

says it has not observed indications of the delivery or introduction of major components

into the reactor containment building.

The new reactor is expected to be larger than the current experimental one at Yongbyon.

For more infomation >> North Korea steps up efforts to build new nuclear reactor: IAEA - Duration: 0:55.

-------------------------------------------

Home cockpit 737 - Build a Boeing: 180 visuals, part 1 - Duration: 5:06.

Hello guys. I am Peter from Build A Boeing. How are you all doing?

The cockpit right now is - as always - one big mess in this rebuild fase.

Nothing has been connected yet. But I've tried to start making a cockpit shell this SimuJabs drawing

And you might be able to see the back frame here - the back wall.

And upper window frame.

Then I started making the lower window frame that should go here.

And there were just too many different angles too many measurements that I couldn't figure out.

so I kind of gave up on that part...

Partly because I got these two projectors!

And I've now started my 180 degrees curved screen project

which is pretty cool.

I'm just testing things right now.

So I'm using bed sheets as screen right now that's why it's a bit wobbly

I've just quickly mounted some thing - some fabric - to project the picture on

The frame itself is made out of wood

and these sections, the two sections here - or two pieces of wood - they cut each at 7,5 degrees.

Put together that is 15 for this one. 7,5 and 7,5.

15 and 15 that makes 30 degrees for a section

And for each 30 degrees I have vertical support - there

That means from the middle there I have 1, 2, 3. Then I have 90 degrees to each side

When mounting these. The way I did it - because I have two - is that I here

in the front put a piece of yellow string and it goes over here to the side

it's like five centimeters away from the wall so that I have room for this support here.

But that yellow line there, you can see it goes - maybe you are able to

see it goes - over there as well. Yes. That is what I call the "flat screen".

That is the areas your projector should be able to fill out.

It forms a "V" as you can see. Then you have an opposite "V" which goes

from the corner of the room and over here to the middle and then back there

and on that line it's where your projector should be mounted.

Then you can use the distance calculator online and you can from that cross right

there calculate how many centimeters back your rejection should be mounted

and that is for me right there.

At least I thought so.

On a normal short throw projector that will beam the top part of the picture in horizontal matter.

But because I have ultra short throw they're working it in a different way with some mirrors

which means because they're beaming downwards

the picture on a curved screen actually goes like this. So it kind of bends down.

That means I have to had to pull them back a bit, to have the picture going from up there and then

bent down here and then back up. Trial and error.

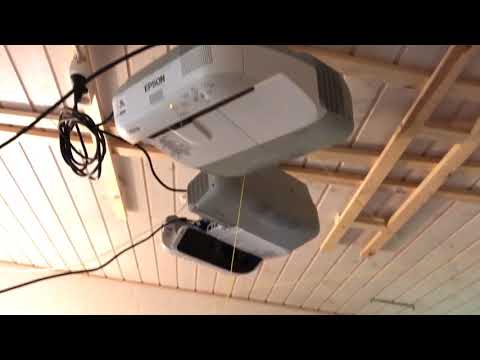
Luckily, I made these two rails here and mounted the projectors onto them.

But then I had to move them back so I came up with a new idea on how to mount these

And it actually works quite good.

You need one rail here and then in the back here one as well.

And then the projectors are mounted on pieces of wood.

But the these two - going that way - are not fasted in a way I can move them back and forth

which means I can move the projectors around until the picture is perfect.

But as there's nothing is going to move the projectors later on they might as well

just lay there on top of these two rails. That means I can actually mount

them unto a nice wooden ceiling like this with just one screw there, one there

and two screws down here. Four screws in total.

My wife like that I've not totally demolished the ceiling

What else... I have a piece of wire hanging

down here this yellow piece here. It goes from the middle up here and where that

is mounded I have the same distance to each side and to the front.

So that kind of marks the viewpoint of where my head should be in the cockpit so that I have

here I have a side view to each side and they saw also the middle of the cockpit.

That means later on I can move my base around so that the cockpit is perfectly

placed in this half circle. So it needs to go forward a bit and then a bit to the side I reckon.

So this is my first attempt at a curved screen.

Next up - in the next video - I will try to start prepar3D and start wrapping the

picture see how that goes... And hopefully within a few weeks I will be able to

have my first flight.

I'm Peter from Build A Boeing You guys take care

Bye bye.

For more infomation >> Home cockpit 737 - Build a Boeing: 180 visuals, part 1 - Duration: 5:06.

-------------------------------------------

How to Build a SECRET ROOM in Minecraft! (Turn Subtitles On) - Duration: 8:33.

Hi, Guys! Welcome back to a Secret Room Tutorial!!!

I am using wood for this room to make the video more understandable

4 Spaces In Between

Instead of using wood, you could make your entrance out of stone or grass

That would meet the standards of the terms, "Hidden Room"

Please Don't Forget to Leave a Like and Subscribe!

Thank You to all who support my channel!!!

For more infomation >> How to Build a SECRET ROOM in Minecraft! (Turn Subtitles On) - Duration: 8:33.

-------------------------------------------

How to Build a Housing Estate | Cities:Skylines - Real Town Planner Plays | Ep 13 - Duration: 9:34.

welcome back every body to my channel

and yes today i am showing you guys how to make

what i interpret as a housing estate

and yes there so many, so so many different ways you could actually make housing estates.

so this is where im going to be doing my housing estate today

and the design i am going for will be a mixture of

flowing roads and some little grid systems.

a lot of green space, pedestrian access and yea.. so

just sit back, relax, get some tips and enjoy.

Okay and so here is the final product and

i guess the first thing i want to mention

about actually designing the housing estate, you dont want to have too many entrances

to the housing estate. I only have one which is actually accessible by a little avenue with trees and theres

some shops right there. and i actually put the shops and schools right at the start of the housing estate because both of those facilities

will create noise pollution, so i wanted to

to keep both noise polluting areas right at the start

away from the rest of the houses and you can see

yea, so you can see right at the start

i dont have, where the roundabout is, i dont have many houses

there is quite a lot of green space

i just wanted to keep it open

not to dense, and i guess, putting a lot of green space right at the start

kind of helps create a nicer atmosphere, and more relaxing atmosphere

because trees and nature help relax you, of course.

and if you're relaxed, you get good vibes and want to live there.

and you will notice for the schools there, i actually

put them on their own little sub road off from the avenue

just simply because i was thinking, like when the parents

drop off the kids and they can jsut drive up on that little road.

its a one way little road but they can still park there

so they can just drive up there

drop off the kids and and its not disrupting any road traffic on the avenue

and also another thing, work mentioning is

i actually put in a lot of some avenues thats because they, the trees

actually help increase the land value $$$ ;)

in real life, but im not sure about in the game

maybe it does a little

but i think at least it raises the value by about, i think $50k

and you'll notice i put in so so many trees everywhere

and thats because

i was thinking the house estate is so far away from the city so

that they're probably wanting a more relaxed lifestyle so more trees

more nature helps get to that relaxing atmosphere.

and once again you'll see that i have so many pedestrian paths throughout the whole housing estate

and thats because i wanted to make it really accessible

to pedestrians and to show its a pedestrian friendly area.

and the main way of getting around in the housing estate is hopfully

through the pedestrian paths.

so anyway thats all i wanted to say for this quick little episode

dont forget to leave me a comment and let me know if you want to see me

build anything else....

so yeah thank you guys for watching and ill see you all in the next episode.

For more infomation >> How to Build a Housing Estate | Cities:Skylines - Real Town Planner Plays | Ep 13 - Duration: 9:34.

-------------------------------------------

Treehouse Building Series #3 - The Yoke - Duration: 3:40.

One of the most challenging parts of planning to build a treehouse is deciding what type

of support platform to build.

And at the same time it can be the easiest given that your tree layout largely determines

what your options are.

In this video we'll go over one of the most popular two tree support systems known as

a yoke.

If you have two trees that are 10-20' apart then you should definitely consider this design.

By building a yoke on each tree you spread out the base of your support system making

it stronger.

The yokes are both fixed to the trees using static brackets.

The yoke that's attached to the larger of the two trees is the anchor.

You'll attach the platform or floor joists to this.

On the other end of the platform you'll install umhw to allow the platform to move freely

on the yoke.

If this design looks familiar it's because it's widely used for supporting bridges

on our roadways.

To build a yoke you use 4x4 or 4x6 lumber, or a combination of both.

I used a 4x6 for the main top support and 4x4's for the knee braces.

The top support needs to overhang your platform by about a foot on both sides to allow room

for movement.

The top support is also notched 1" on both sides to allow for installation of the knee

braces.

The knee brace is also lagged into the top support for added strength.

To learn how to calculate and cut these angles check out this great tutorial from treehousesupplies.com.

I found this tutorial the most helpful and it's what I used when building my yokes.

The knee brace brackets vary depending on where you get them from.

The ones I used from treehouses.com are two separate brackets and therefore are more versatile.

The knee brace brackets are installed by cutting a slit in the middle of your lumber, drilling

holes, and then bolting the bracket in place.

Be sure that your lumber rests on the metal plate and not on the bolts.

The bolts are there to hold the knee brace in place and not to support the structure.

To install the yoke you first install the top TAB so that it points directly at your

second tree.

The easiest way to do this is to wrap string around the two trees and install your TAB

parallel to those strings.

Once the top is installed you can lift the yoke into place and rest it on the TAB.

Depending on how high your tree house is this can be pretty challenging since the yoke is

fairly heavy.

I borrowed a play right out of Pete Nelson's playbook and utilized my old Ford truck and

a pulley system to make this effortless.

With the yoke in place you can then mark your bottom hole to drill and install your second

TAB.

When marking this TAB err on the side of a little high rather than a little low.

It's better for the yoke to be squeezed into compression when installing versus pulling

it apart.

After the first yoke is installed you can line up the second one using a laser level

or a simple water level.

At that point you can either put two beams across your yokes followed by floor joists,

or install the floor joists directly on the yokes like I did.

If you've got more than two trees then there are other options available.

Three trees works great for creating a triangle out of beams and building your platform on

that.

And you can always build a yoke on one of the trees to help open up that triangle.

Four trees in a rectangle with two main support beams is really ideal.

Just remember to pick an anchor tree to attach the beams to and use dynamic, floating brackets

on the other three points.

This two tree yoke system is a very popular design given that most people don't have the

luxury of three and four tree layouts.

Depending on the spacing between your trees, it allows you to still have a fairly large

treehouse even though you're only building in two trees.If you have any questions I didn't

cover feel free to leave those in the comments.

If you've enjoyed this video or found it helpful please give it a thumbs up.

Be sure to subscribe so you don't miss the other treehouse videos in this series.

And as always, thanks for watching.

For more infomation >> Treehouse Building Series #3 - The Yoke - Duration: 3:40.

-------------------------------------------

ROBLOX | build a boat for treasure | boat got to big XD - Duration: 5:10.

hi guys its Coolsauce Doughnut and today Im going to be playing build a boat for treasure on ROBLOX

as you can see the boat is really big

theres not really a point to this video but i just wanted to show this big boat me and some friends made

also i decided i was going to do a Vlog channel and none of the other possible channels i mentioned on my channel update video

lol look at where the arrows pointing gilgamish morphed through th boat

gilgamesh died R.I.P.

oh look at the arrow here he comes

our boats stuck

gilgamesh got back on yay

look at the bandicam thing at the top of the screen lol

our boat is too big

lol we lagged out the game w/ our big boat

the chats not working.....oops

someone died

thats the gltich of the night

how to do it

make a big boat

nothing was working

i even reset my character

nothings happening

also i am going to be adding my voice in my videos but it wont let me put the voice in so i need to figure how to get that o work and than ill have my voice in vids

also i still need to figure out how to work my camera but once im figure that out my Vlog channel will be ready

theres the map

it was there

this is Coolsauce Doughnut

see you later

Không có nhận xét nào:

Đăng nhận xét