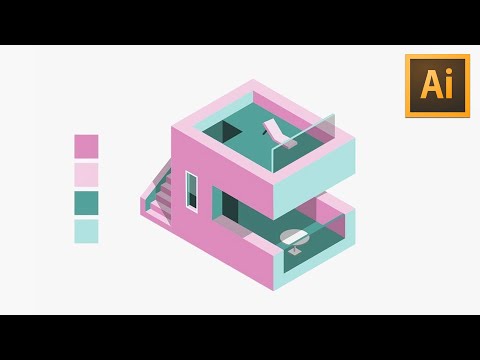
do you want to learn how to design a modern isometric house in Adobe
Illustrator if you do follow along today and learn some skills and techniques
that's going to enable you to design the dough by symmetric design as designers
it's important to have a website to show off our portfolio of work bookmark
offers the most straightforward and quickest way to generate an awesome
website without even having to write down a single line of code and all
completed in a matter of minutes check out the link in the description below to
learn more about bookmark and design your website today so first and foremost
I'm actually working in an RGB document today and you're going to need two base
colors and then one pale version of each color so essentially a monochrome
version of the original we need an isometric grid for our design today and
to make that locate the rectangular grid tool below the line tool in the tools
panel and then just click the artboard one time now you can use the same
measurements as I'm using on mine but just make sure that the vertical and the
horizontal numbers are the same values now on my last isometric tutorial a
viewer suggested creating an automated action to perform the next step and I
did try that but the problem is that the transform values do not equate to a
percent value they follow a set number of Heights instead of percentage so
we're going to need to first rotate this grid by 45 degrees
and then come into the transform window
and alter the heights to fifty seven point two seven four percent exactly it
would be great if it astray to cuddle to make this function but like I said it is
straighter does not remember this action as a percent rather fixed heights now
besides your grid the holding number the alt/option key and shift at the same
time
send the grid to the very back of all layers and then lock their grid and also
the colors down by pressing command or control 2 on your keyboard so we're not
ready to start the isometric design of a house in today's Illustrated tutorial
press I for the eyedropper tool sample one of your darker colors and then press
P for the pen tool I begin to draw out a shape just as I'm doing here simply
follow your isometric grid and also make sure to keep the vertical lines at the
same size so my design is going to be 5 grid squares in height
I've also pressed the caps lock key so that my pencil icon turns into an X and
it just makes things more precise and easier when drawing with the pen tool
and you're going to need to toggle the smart guides on and off throughout
today's tutorial depending on what you're doing and you can do that by
pressing command or control you now as you can see the smart guides will help
me align the vertical lines on the right hand side
once you've drawn your shape and pressed V to select off of the path and then
press Shift + X to flick the stroke over to a filled shape and that's the first
design component for the isometric house in today's video you can never size your
shape but just make sure that you hold down shift when you resize it to scale
it use the eyedropper tool to sample the lighter version of your color and again
use the pen tool to draw the top of the ledge on your house like I'm doing here
repeat the same process of pressing V to select off the path when you're finished
and then select the lighter version of your second color we're now going to
draw the front edge of the isometric house which again is just a matter of
using the grid to follow along with in an isometric style so when finished
again press Shift + X to change the stroke over to a fill our isometric
house is starting to take place I've gone ahead and added the block shape for
the second floor of the house but also I have to drill one square at the top so
drew a larger one first and then the innermost smaller one after when
completes select both of the squares now flick the strokes over to a fill by
pressing Shift + X and then use the minus front option in the Pathfinder
window now it's very very simple to make the bare essentials for the structure of
the house using the isometric grid and the pen tool and I'm gonna fast forward
to save time today in the video but pause the video to see which colors I've
used and which shapes make up the house also take note the shadow here this is a
black shape of 25 percent opacity and this is going to be crucial for the
final effect in today's tutorial now I'm going to use this shadow technique on
the lower floor of the house firstly I'm gonna change the fill of the shapes over
two strokes with shift an X so I can see the grid below to use as a guide
so what does I draw in the shape to represent the shadow on the bottom floor
of the house using the black color with 25% opacity now it's complete is then
time to flip the stroke back over to a fill and as you can see that looks
pretty awesome the next step in today's isometric tutorial is to drawing through
steps I've gone ahead and done that using the grids but of course they're
way too large obviously so what I'm going to do here is to select the shapes
that make up the steps and then go into the transform window I can simply change
the height and the width values to 50% exactly which will scale down the stairs
by 50% in total 1 scaled down and place the steps against the edge of the house
and then adjust as you see fit today's tutorial is pretty straightforward
actually if you follow the isometric grid finally for the stairs
select the shadow to sample its color and opacity and then drew in a shape as
I'm doing here to represent more shadow for this use the pen tool of course
it's now time to add some details to the isometry design so follow along a nest
add some detail to the house I'm now working off of the artboards and i'm
going to make an oval using the ellipse tool but you can locate by pressing L on
your keyboard once you've made the ellipse flip the Phil over to a stroke
and then hold down the alt option key and click and drag to duplicate it below
bring the original circle to the front of all layers and the locates the add
Anchor Point tool in the toolbar menu carefully add an anchor point as I'm
going to do here and then press a the direct selection tool and move the
anchor point up this is basically just going to create the illusion of a 3d
table for your design today flick the strokes and back to fills and then make
sure the lower oval is a darker grey compared to the upper one now it might
be handy to select both of the ovals and then press command or control key to
group everything together and then move the object onto your isometric design
bring the shadow to the front of all layers to complete the effects at this
stage now we're going to finish the table so locate the rectangle tool and
draw a small rectangle like so now I'm working in illustrator CC and if you're
doing that as well you can use the live corners by selecting the direct
selection tool but if you don't have CC and you're using something like CS then
you can have to use the round corner effects under the top drop down menu of
effects now bring the tabletop and the shadow to the front wall layers and then
add a gradient to the lower parts
now I wish I would have organized my layers in the layers window for this
design and I suggest that you do that for your workflow because it is easier
and more organized so finally for the table
flick the floor over to a stroke with Shift + X and then draw an isometric
Square using the grid finally scale down the square you can
also add extra parts below to finish up the 3d illusion of your table now we've
nearly finished to isometric house in today's video and as you can see here on
the front of the ground-floor I've had it a green rectangle and also a
rectangle of black 25 percent opacity this gives an illusion of a glass panel
on the front of a modern house and at the top I've also made a deckchair using
the isometric grid and it's very straightforward to do if you follow the
grids for your design so finally let's make a neat window to the isometric
house have a white stroke 2 rectangle here following the isometric grid and as
before it helps to change the fills over to a stroke so you can see the grid
below use the correct colors from your palettes and then draw the lower ledge
with the windowsill
then also finish up the side ledge using the pen tool for every shape that I drew
I select the white frame and then bring it to the front of all layers
finally I'm going to add a dark dark green to show the inside of the window
now of course you need some glass for a window and I'm gonna represent the
window as being half open using my light green color in the color palette I can
quickly draw in the glass panel and then lower the opacity to finish the effect
remember to bring the white frame to the front of all layers and then flick the
pink shape of the side of the house over to a fill and there you have it guys
one isometric house made in a day really straighter feel free to experiment with
details and layouts but just remember to utilize the isometric grid throughout
the entire design and I also suggest that you use the layers window and label
your layers so you can hide them easily I totally left that out of my work
clothes today and I do regret it but yeah let me know what you think of
today's design and the video down in the comment section below subscribe to to
tor graphics you have done already and of course like and share my content on
social media if you and have liked the channel and until next time guys design
your future today peace
you
Không có nhận xét nào:
Đăng nhận xét