Hey, how's it going? This is Todd Baginski. I'm a Microsoft MVP and the
Partner and CTO at Canviz.
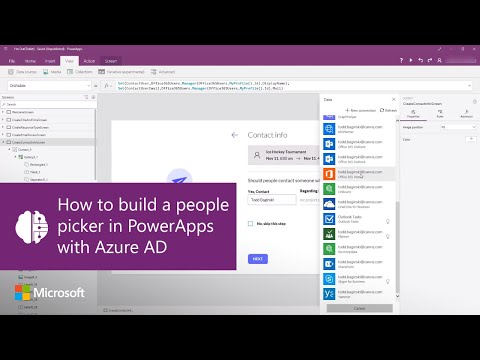
In this video what I'm going to dive into is how we created a people
picker so that you can select other folks in your
Azure Active Directory (AAD) from your PowerApp. I think the easiest way to get started with
this one is just to take you on a little tour the app up to the point where I used to people picker and
I'll show you how we built it so I'm going to start the PowerApp here.
And, when I start this PowerApp if you seen it before you know, what's going on here. If
you haven't, you can watch my demo overview video of this particular
application and my demo overview video I show the mobile form factor of this
(or the phone form factor). But this is the tablet form factor. So
when I come in the first thing it's going to do is show me the different appointments
my calendar that I may need to set and out of office for. So I'll set one for
upcoming ice hockey tournament and this is where I said how long it's going to
take but I'm not going to focus on these pages right now or the type
or which email access I'll have but I really want to show you is here:
the people picker. So you can see it pre populated
the name of the user who is marked
as my manager in my Azure Active Directory.
And that's Tim, so you can see his name there. But we also have other capabilities here
we can search for anybody by just starting the type their name. So, for example,
if I take my name, Todd, here we have all the different
Todds that are in our Azure Active Directory. I can then select
one and move on to my next page or I can look for somebody else, for
example, if we have a couple alex's and the company so then I can select
one there so as you can see that's really quick.
So, let me show you now how we actually dig into the code
here and implement this capability of people picker from Azure Active Directory.
First thing I'm going to do is close
the player and check it out in edit mode to show you here.
So, I'm on the create contact info screen you can locate this
is well if you download the app and place and into your
environment and this is really how it works. What we have here
is a gallery control you can see I've highlighted it right here and this
is actually what implements that people picker that we saw in that drop down right there.
You'll notice in my "items" property here the first thing I do
is I see is text input to underscore one.
Which it's text value if it's not blank then I'm going to
proceed so that's this text box right here.
Notice it has a value of "ContactUser" assigned to it. Once we pick
a user we're going to set them equal to this variable and that's going to show their name there.
So, after we see if that's not blank, then what we're going to do is going to
say is contact user equal to what was in there. If they are equal
there's no sense in going to do a search for
that user. We know someone's already typed their name and picked it.
However, if he's taken something different than what's
already set is the contact user variable now we're going to go off the
"Office 365 Users" connector and call the search user
method. Then we're going to pass in the search term.
Which is the actual text we saw
before in TextInput2_1.
That's all there is to it. The next thing that you'll notice
about this is that because this is a gallery,
and, this is my "Items" collection means that every time I
type in something new there - that call to office three sixty five user's search user is
going to execute and that's why we're going to see the items collection
update as gallery update. So if I back it up here in design mode content and type in
"t" and now it's pulling up all kinds of different people who start with
"t". Add the "o" to it. Now we're down to just
Todds and "Todd b-a-g". Now we're down to just my
accounts in the Azure Active Directory.
So, again, here you can see if I pull it down again at the top.
Really the piece
that is executing a search is the office three sixty five users
that search user whatever I typed in there.
Now if we take a closer look at the gallery we can see that as a custom data source
defined and that is because we programmaticly created
the items collection, we've pick the title layout swirling displaying
one column that's the user's name here and then within that.
Office three sixty five users when we make that "search user" call
gives us all these different things that we can pull from about that user. In this case
we've chosen "display name" and that's why that appears there. If I chose something else
like "job title," then I could go search on just users and just put all
their job titles in here or something like that. That's what I choose to do.
That's a real quick way that you can implement this functionality.
One other thing that I'd like to show you about how we actually set
the variable equal to the name of the one you select and people
picker
is over here.
Now this is a rectangle and if you watch my video
on the transparent rectangles you can see how we use this. We lay the transparent
rectangle over top of all the controls inside here - the separator as
well as the text value the displays our names.
Then when user clicks on this transparent rectangle, this is where we
go and set the variable's contact user.
This item display name is what we set it equal to. This item is
the currently selected item in the gallery so we're going to display
its display name and set that equal to contact user variable.
Now we have the contact user email so that's again the selected item,
their mail property gets you there contact user email. so that means
when I go play the app and I select the user,
I just clicked on that transparent rectangle and it set those properties. So now
that those properties, or I should say variables, are set I can come
back in here and take a look at all the different properties and the app and I can
see, lo and behold, there I am, the contact user. So those values are
then set and you can use them in subsequent pages
as the application unfolds. So that's a real quick way to make people
picker with the Office 365
User Search capability.
So now maybe wondering, "well how did I get the ability to call
that connector called Office 365 Users right here?" Well it's
really easy to add. All I need to do is go to view,
Pick data sources, and you'll see had it added
here but I can just pick "Add data source"
and it's going to be in your list.
Office 365 Users right there. If you don't see it in your list, go up to New
connection" and look for Office 365 Users and authenticate to it and now
that collector will be available for use in your PowerApps too.
I hope this PowerApp and the video helps you out. See you next time.

Không có nhận xét nào:
Đăng nhận xét